

- Global Network designed to everything on the Internet secure, private, fast, and reliable
- CDN, DNS, DDoS Protection, Bot Management, Load Balancing, WAF, and more
- Intelligent Routing, Mobile & Image Optimization, Video, and Cache

- 30 Day Refund Policy
- The Ultimate Privacy and Security with Low-Cost SSL Certificates, PremiumDNS, VPN, and A Range of Features Included with Each Account
- One of The Most Knowledgeable, Friendly, and Professional Support Teams Available 24/7
Cloudflare vs Namecheap: Quick Summary
Namecheap is the better overall choice, but only if you want to host a regular website. It’s easier to use, more affordable, and beginner-friendly with everything built in: WordPress, email, backups, cPanel, and live support.
Cloudflare is faster and more secure, but it’s clearly made for developers and advanced use cases, not for someone just trying to launch a website without touching code.
1. Prices and Plans Comparison
Namecheap’s Lower Hosting Prices Beat Cloudflare’s Developer-Focused Pricing.
Namecheap clearly offers more affordable options, especially for beginners or small businesses. I found that their shared hosting starts under $2 per month, while WordPress hosting and even VPS options stay budget-friendly.
Cloudflare, on the other hand, caters more to developers with usage-based pricing—great for scale, but it can get expensive quickly.
For example, Cloudflare Pages is free to start but jumps to $25/month for Pro, while Workers pricing scales with usage. Unless you’re building apps at scale or need edge computing, Namecheap gives you way more for your money upfront. If you’re just hosting websites, Namecheap is the better deal.
2. Customer Support Comparison: Who’s Got Your Back?
Namecheap Offers Fast, Human Support — Even on Basic Plans.
When you’re building a site, especially as a beginner or small business owner, having reliable support can be the difference between a quick fix and hours of stress.
Cloudflare Customer Support
Since I was on the Free plan, I wanted to see how much support was actually available without upgrading.
I logged in, went to the top right corner of my dashboard, and clicked Support.

From there, I was taken to a help page where Cloudflare offered two paths:
- One for Free users to self-diagnose or get help with billing and domain registrar issues.
- One to upgrade to access live chat or premium ticketing.
I selected “Technical Question” to test their AI-powered help system. My question was about how their CDN handles cache expiration and best practices for keeping content fresh.
Instead of getting a human agent, I received an instant AI-generated answer. It summarized the documentation quite well, explaining headers like Cache-Control, the ability to purge cache, Edge TTL settings, and so on.

The answer was technically solid and fast (about 1 minute). But if you’re hoping to chat with a real person for nuanced or urgent issues, you’ll need to upgrade. For a free service, the self-help resources are decent, but they’re geared more toward developers and intermediate users. Beginners may feel stuck without live assistance.
Namecheap Customer Support
For Namecheap, I tested their 24/7 live chat, which is available to everyone, even on entry-level plans.
I clicked the chat bubble on the bottom right corner of the Namecheap homepage. After selecting that my question was about hosting, I typed in a quick support question. I wanted to know if PHP 8.3 was supported on the Stellar Plus shared hosting plan — and if so, how to activate it through cPanel.
Within 30 seconds, I was connected to a live human agent. They answered quickly and clearly: yes, the latest PHP version is supported, and they even gave me a direct link to the step-by-step guide showing how to enable it in cPanel.
The tone was friendly and helpful throughout the chat. They didn’t pressure me to log in or verify my account, which I appreciated since I was still exploring whether I should switch.

Namecheap’s live chat was fast, friendly, and practical. For basic questions, this is exactly the kind of quick reassurance you want before signing up.
3. Hosting Features Comparison
Namecheap Offers More Complete Hosting Features for Website Owners.
Cloudflare Features
I’ve worked with Cloudflare on several projects, and it’s fantastic if you’re a developer or managing high-traffic apps. Cloudflare gives you powerful tools like serverless functions (Workers), a global CDN, DDoS protection, and performance optimizations right out of the box.
With Cloudflare Pages, I was able to deploy a static site in minutes—it connects directly to GitHub, automatically builds with every push, and serves your site globally with zero setup.

Once the site was live, I layered on Cloudflare Workers to handle things like form submissions and dynamic redirects—all running at the edge, without needing a backend server or database. It’s a powerful setup, but definitely built for developers, not typical website owners.
You can also deploy static sites and use R2 for storage or Stream for video delivery. But if you’re just building a regular website and need tools like email, file managers, or a control panel, you’ll feel like something’s missing. It’s not built for that.
Namecheap Features
I personally tested Namecheap’s Stellar plan and found it perfect for setting up a basic site. I was able to install WordPress with just a few clicks through cPanel, and I liked how everything—email, SSL, backups (on higher plans), and even a website builder—was clearly laid out.
The AI tools helped speed things up when creating content. The Site Maker builder made it really easy to launch a one-page portfolio. I also appreciated their Supersonic CDN and the smooth integration of domain, SSL, and hosting in one place.
For everyday website projects, this just felt more complete.
4. Website Performance Comparison
Cloudflare Is Faster and More Optimized at the Edge.
To truly compare how fast and efficient each provider is, I needed real-world performance data. That’s why I ran GTmetrix tests on two actual websites — one deployed through Cloudflare Pages and another hosted with Namecheap shared hosting.
Cloudflare Website Performance
I tested a live site hosted on Cloudflare Pages, which is optimized for fast static site delivery at the edge.

What made this impressive is how fast the first byte arrived and how quickly the main content loaded. Since Cloudflare runs its CDN and serverless hosting from edge nodes in 330+ cities, everything was lightning-fast, even without a traditional web server.
Their Argo Smart Routing and optimized caching clearly help deliver near-instant content globally.
Namecheap Website Performance
Next, I tested a WordPress site hosted on Namecheap’s shared hosting.

While Namecheap’s site didn’t perform poorly, the numbers were noticeably behind. The backend connection and server response were the slowest parts — something that’s expected on lower-cost shared hosting plans.
Page structure and frontend optimization weren’t bad, but it took almost 3x longer to fully load the page compared to Cloudflare.
5. Ease of Use Comparison: Which Platform Is Easier to Use?
Namecheap Is Easier for Website Owners to Use Right Away.
Registration and Creating a New Account
I wanted to start by evaluating how easy each provider makes it to create an account, because a complicated signup process is a red flag, especially for beginners.
So I began with Cloudflare. I visited the Cloudflare Pages section and clicked Get Started.

This led me to a signup form where I entered my email and created a password. After that, I clicked Sign Up, and Cloudflare immediately prompted me to verify my email address before continuing.
Once verified, I was taken straight into the Cloudflare dashboard. From here, I was shown two options: start with Pages or Workers. I chose Pages, then selected Import an existing Git repository.

Cloudflare asked me to connect my GitHub account and authorize access. After authorization, I was shown a list of my repositories. I selected the one I wanted to deploy and was then asked to confirm the build command, build output directory, and environment settings.

This part felt smooth, but only because I’m familiar with Git and build tools. For non-developers, it’s a steep learning curve right out of the gate. It’s clear Cloudflare is built for a developer audience.
Next, I moved on to Namecheap. This time, I wanted to see how simple it would be for someone completely new to web hosting.
I clicked Sign Up in the top corner of their homepage.

The registration form was clear—username, password, first and last name, and email. No technical jargon, no unnecessary questions.
Once I submitted the form, I was instantly logged in and landed on the client dashboard. No email verification delay. No complex setup screens. That made a great first impression.
Overall, Namecheap’s registration was much more beginner-friendly. It’s simple, fast, and focused on getting you into your account without friction.
Client Area and Dashboard
Next, I wanted to evaluate the actual dashboard experience. For me, this is where things either click or start to feel overwhelming. A good dashboard should make it easy to find what you’re looking for without digging through menus.
Starting with Cloudflare again, I explored the main dashboard. You don’t get a “client area” like you do with traditional hosts. Instead, you land in one unified dashboard where everything—DNS, Pages, Workers, WAF, caching, performance, analytics—is all packed into a single control panel.

To get to Pages, I clicked Workers & Pages from the left menu. There, I found my previously imported Git repo and clicked into the Pages project. Each project had a well-organized structure—Overview, Deployments, Custom Domains, Environment Variables, and more. I could clearly see the status of each deployment, preview URLs, and build logs.
It’s powerful—but not easy. For every setting, you need to know what it does. It’s not built for someone who just wants to launch a website without touching code.
Then I checked the Namecheap dashboard. After logging in, I went to the Apps section and launched EasyWP, their managed WordPress hosting product.

From there, I immediately saw my WordPress site listed with clear status indicators—green for online, orange for maintenance mode. I clicked Manage, and the interface opened up all the essential tabs: Overview, Backups, File & Database, Security, Analytics, and Add-ons.

I really liked how clean and guided it felt. For example, in the Overview tab, I could quickly change domains, enable maintenance mode, or manage my SSL certificate. No guessing. The dashboard told me exactly what to do.
Compared to Cloudflare, Namecheap’s UI felt much easier to navigate, especially for non-developers.
Hosting Setup – Creating a New WordPress Website
Next, I wanted to test how easy it is to create a WordPress site. Since most people use WordPress for their website, this was a key step.
I skipped this for Cloudflare. Why? Cloudflare Pages doesn’t support traditional CMS platforms like WordPress out of the box. It’s built for static sites (JAMstack), not PHP applications that require MySQL databases and dynamic rendering.
If you want to use WordPress with Cloudflare, you’ll need a separate origin host and only route traffic through Cloudflare’s CDN. So, I didn’t test the WordPress setup here because it’s not a direct feature of Cloudflare’s platform.
But with Namecheap, I tested both methods—via cPanel and EasyWP.
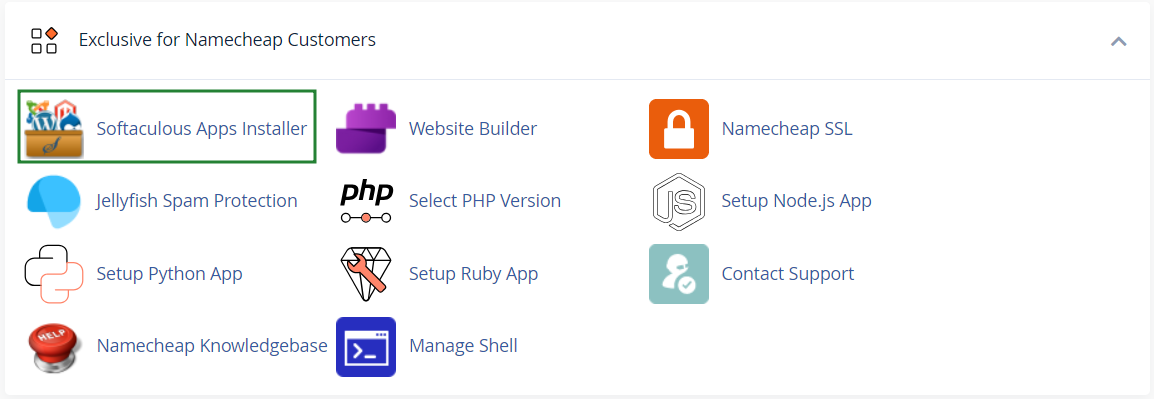
- Using cPanel: I logged in to my hosting account, went to the Softaculous Apps Installer, and clicked on WordPress. The installation process was simple—I selected the domain, set my site title, admin credentials, and hit install. Within a minute, WordPress was live and ready to use.
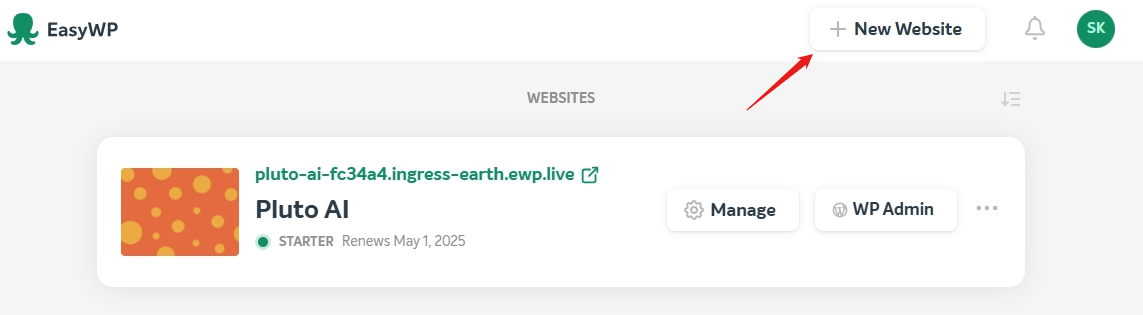
- Using EasyWP: This was even easier. From the EasyWP dashboard, I clicked New Website, entered my website name, and selected a domain. Namecheap did the rest—automatically provisioning WordPress in the background. No manual setup, no file uploads, no database configuration.


Between both options, Namecheap clearly made setting up WordPress faster and easier than any other host I’ve used. Even someone with no experience could follow the steps and get a site online in minutes.
Creation of Backups
Backups are one of those things you don’t care about—until something breaks. So I wanted to see how easy it is to manage and create backups on both platforms.
On Cloudflare, there’s no concept of website backups. Since you’re deploying static files via Git, the idea is that your Git repository serves as the source of truth. If something breaks, you roll back to a previous commit. That works for developers but offers zero convenience for casual users. There are no point-in-time backups, no one-click restore options, and no interface to manage backups visually.
On Namecheap, it was a completely different story. In the EasyWP dashboard, I clicked into the Backups tab and was greeted with clear options to create a new backup and see a list of existing ones.

Each backup showed the date and let me restore it with one click. This was exactly what I needed—simple, effective, and visual.
Namecheap also includes automatic daily backups on higher-tier plans like Stellar Plus and Stellar Business. So once I upgraded, I didn’t even have to think about it.
Server Management
Lastly, I wanted to check how much control I had over the servers, because some projects need deeper access for performance tweaks, monitoring, or resource usage.
Cloudflare, again, doesn’t give you traditional server access. It’s a serverless platform, so there’s nothing to configure. No SSH access, no file system to browse, no PHP settings to adjust.
Everything runs in Cloudflare’s edge environment. You deploy code, set environment variables, and configure routing rules. That’s it. There’s no server to manage—by design.
With Namecheap, it depends on the plan you choose.
- On shared hosting, I used cPanel to manage files, databases, SSL, and more.
- On VPS and dedicated servers, you can choose between Webuzo and cPanel, and you get root access, SFTP, and full control over the OS.
- On EasyWP, while it’s a managed environment, you still get access to key controls—like file management (via SFTP), database access (via phpMyAdmin), CPU/RAM usage graphs, and toggles for CDN and security tools.

Namecheap balances ease of use with just enough control, and that made it feel far more flexible for real-world use.
6. Privacy and Security Comparison: Which Platform is More Secure?
Your Data Is Safer in the Hands of Cloudflare.
Cloudflare Privacy and Security
I’ve worked with Cloudflare on multiple sites, and they clearly take privacy seriously. They don’t sell user data and regularly publish transparency reports. I especially appreciate their built-in privacy tools like DNS over HTTPS, Encrypted SNI, and full support for TLS 1.3. Even on the free plan, Cloudflare automatically issues a Universal SSL certificate, giving you HTTPS from day one.
What stood out most to me was their always-on DDoS protection. You don’t have to configure anything—it just works. Their global edge network absorbs threats before they even reach your site. When I used Cloudflare Workers and Pages, all requests passed through this secure edge layer.
They also offer a Web Application Firewall (WAF), but only on paid plans. That said, even without the WAF, you can set up custom firewall rules, use rate limiting, and rely on bot protection to filter traffic.

Their Zero Trust suite, including Cloudflare Access, was especially powerful for locking down internal apps without a VPN.

While Cloudflare doesn’t offer traditional backups or malware scans, they hide your origin server IP, support DNSSEC, and give you control through a robust set of edge tools. If you’re securing traffic, protecting uptime, and keeping your infrastructure hidden, Cloudflare excels.
Namecheap Privacy and Security
Namecheap, on the other hand, takes a more traditional approach—great if you’re hosting a typical WordPress or eCommerce site. I liked that they include PositiveSSL certificates on all shared hosting plans. I activated mine with just one click.
Their Supersonic CDN adds a layer of DDoS protection, and every shared hosting server has built-in safeguards against attacks. I tested this on EasyWP, and while I couldn’t see traffic logs like Cloudflare, I did get peace of mind knowing my site had that extra shield.
Inside the EasyWP dashboard, I found two security tools:
- MalwareGuardian: This scans the site every 2 hours and sends alerts if threats are found.
- HackGuardian: This locks down file access to prevent unauthorized changes. I could toggle both with a simple switch.

What really sets Namecheap apart is daily backups. On higher plans like Stellar Plus, backups run automatically. I also appreciated the two-factor authentication (2FA) and WHOIS domain privacy, both of which help keep my account and personal info safe.
However, Namecheap doesn’t have a secure access manager or edge-based firewall as advanced as Cloudflare’s. For users running critical apps or APIs, that could be a drawback.
7. Server Locations Comparison
Cloudflare Has the Widest Global Network Reach.
When comparing server locations, I wanted to find out who could deliver content faster and more reliably to people across the globe.
Cloudflare runs one of the largest global networks in the world, with 330+ cities in over 125 countries, including mainland China. I was impressed by how close they keep their edge servers to users—95% of the world’s population is just 50ms away from their network.
And this isn’t just marketing fluff—I’ve seen faster load times in real-world deployments when serving static sites or APIs from Cloudflare’s edge. This network is designed for developers, enterprises, and global platforms that need speed and scale.

Next, I looked at Namecheap’s data center coverage. They do offer multiple server locations, but only for shared hosting. You can choose between:
- USA (Phoenix, Arizona)
- Europe (Amsterdam)
- UK (Farnborough)
- Asia (Singapore)
For VPS and dedicated servers, you’re locked into the PhoenixNAP data center in Arizona. So, unless you’re on a shared plan, you don’t get global flexibility. On the plus side, Namecheap does allow free migrations between data centers if your audience shifts, but you’ll need to contact their billing team for help.
Cloudflare vs Namecheap: The Bottom Line
Namecheap is the overall winner because it offers everything a regular website owner needs, at a low price and with zero complexity. From free migrations and WordPress setup to live chat and backups, Namecheap is much easier to work with if you’re building a blog, store, or business site.
| Category | Winner | Why |
|---|---|---|
| Pricing and Plans | Namecheap | Offers cheaper plans with more features upfront—great for beginners. |
| Support | Namecheap | 24/7 human live chat support, even on entry plans. |
| Hosting Features | Namecheap | More complete for website owners—email, backups, builder, cPanel. |
| Website Performance | Cloudflare | Blazing-fast speeds with edge delivery and lower TTFB. |
| Ease of Use | Namecheap | Easier setup, dashboard, and WordPress integration. |
| Privacy and Security | Cloudflare | Advanced edge security, DDoS protection, and Zero Trust tools. |
| Server Locations | Cloudflare | 330+ cities globally vs Namecheap’s 4 regions. |

