


- Over 600 000 customers with 15 data centers worldwide
- Raid SSD-based virtual servers, excellent bandwidth features, 55-second server deployment, flexible API, Kernal-based Virtual Machines, Hex Core racks, dedicated ECC RAM, and DO server snapshot
- The redundancy and capacity of DigitalOcean clouds are ensured by Tier-1 networks and 10-gig-E connections

- 32 Tbps Global Network Capacity
- 33 Data Centers that cover four continents
- Web Hosting, Public Cloud, Private Cloud, VPS, Dedicated Servers, and Enterprise Solutions
DigitalOcean vs OVHcloud: Quick Summary
OVHcloud delivers a more complete hosting experience. OVHcloud outperformed DigitalOcean in terms of performance (1.1s vs. 4.1s page load), ease of use (automatic WordPress installation, included email hosting, and a visual control panel), and global reach (43 vs. 12 data centres).
OVHcloud also includes critical features by default (daily backups, automatic SSL, malware scanning, and live chat support) that DigitalOcean charges extra for or doesn’t offer. For traditional website hosting with enterprise-grade infrastructure, OVHcloud is the clear choice.
1. Prices and Plans Comparison
DigitalOcean wins with Simpler, More Transparent Pricing Structure.
When I compared both providers, I found DigitalOcean offers a cleaner pricing model that’s easier to understand. Their virtual machines start at just $4/month with predictable monthly caps, while OVHcloud’s compute instances begin slightly higher with hourly billing that can be confusing.
DigitalOcean’s managed databases start at $15/month compared to OVHcloud’s similar offerings, and their object storage (Spaces) is straightforward at $5/month versus OVHcloud’s complex tiered pricing.
What really sets DigitalOcean apart is its generous free tier benefits, including 500 GiB outbound data transfer per Droplet and free cloud firewalls, while OVHcloud charges for most extras. For AI workloads, DigitalOcean’s GPU pricing starts at $1.49/hour with contracts, whereas OVHcloud’s comparable GPU instances run around $2.16/hour, making DigitalOcean more budget-friendly overall.
2. Customer Support Comparison: Who’s Got Your Back?
OVHcloud Offers More Support Channels and Faster Response Times Than DigitalOcean.
DigitalOcean Customer Support
DigitalOcean provides free 24/7 ticket-based support to all customers, accessible through the control panel. However, the response times and available channels vary dramatically based on your support plan.
Support Plans and Response Times:
- Starter (Free): Ticket support only, response within 1 day
- Developer ($24/month): Adds live chat, response within 8 hours
- Business ($99/month): Priority support, response within 2 hours
- Premium ($999/month): Dedicated Slack channel, video calls, response within 30 minutes

I decided to test their support firsthand to see how responsive and helpful they actually are. From the dashboard, I clicked Support in the left menu, then Create Ticket.
DigitalOcean clearly displayed my expected response time: “Within 1 day” since I was on the free Starter plan. This transparency was appreciated. I knew what to expect upfront.
My Question (Submitted at 11:46 AM):
“Hi. I am planning to delete my droplet as it’s currently expensive for me to maintain. However, I’d like to save the entire contents of my droplet so I can restore it or use it later when I need to. Could you guide me on the best way to:
- Back up all my files and databases from the droplet?
- Take a snapshot or export the droplet for future use?
- Minimise storage costs while keeping my data safe?
I want to ensure I don’t lose any important data and configurations. If there are any specific tools or methods you recommend for this process, please let me know. Thank you for your help!”
Response Time: I received a reply at 01:18 PM, just 1 hour and 32 minutes later, far faster than the promised 1-day response time. Impressive!
Akshay Khule, a Cloud Support Engineer, provided a detailed, technically accurate answer covering:
- How to create snapshots before destroying the Droplet
- Critical warning: A checkbox during deletion could accidentally remove snapshots, important safety tip
- Snapshot limits and best practices (with documentation links)
- Alternative method: Using rsync or SCP commands to download files manually
- GUI tool recommendation (FileZilla) for non-technical users
- Multiple documentation links for SSH connection, Droplet console, rsync, and SCP usage

Positives:
- Much faster than promised (90 minutes vs 24 hours)
- Technically accurate and comprehensive answer
- Multiple solutions provided (snapshots, manual file downloads, GUI tools)
- Helpful warnings about potential pitfalls
- Extensive documentation links for self-service learning
- Professional, friendly tone
Negatives:
- No live chat on free plan. I had to wait even though response was fast
- Higher-tier features locked behind expensive plans ($24–$999/month)
Community Resources:
DigitalOcean’s Community tutorials are exceptional. I explored their knowledge base and found thousands of well-written guides covering everything from server setup to application deployment. Many tutorials include step-by-step instructions with code examples. The community forums are active, with both staff and experienced users providing answers.

Overall Impression:
DigitalOcean’s support is developer-focused and technically competent. If you’re comfortable with documentation and don’t need hand-holding, the free tier support is adequate. However, the lack of live chat on free plans and absence of phone support entirely might frustrate less technical users or those needing immediate assistance.
OVHcloud Customer Support
OVHcloud takes a more comprehensive approach with multiple support channels and tiered support levels that let you choose the appropriate level for your business needs.
Support Tiers:
- Standard Support (Free): 24/7 ticket system, chatbot, community forums
- Advanced Support (Paid): Faster response times, phone support priority
- Business Support (Paid): Dedicated support engineer, proactive monitoring
- Enterprise Support (Paid): Named technical account manager, 24/7 priority phone, custom SLAs

I tested OVHcloud’s support using the Standard (free) tier included with my hosting plan.
Live Chat Test:
After logging into the OVHcloud Control Panel, I immediately noticed a chatbot icon in the bottom-right corner. I clicked it and was greeted by their virtual assistant offering help.
I typed a technical question: “Does your Public Cloud support custom kernel modules for specialised networking hardware?”
The chatbot immediately provided relevant documentation links and offered to connect me with a live agent. I clicked “Connect to agent” and within 2 minutes, I was chatting with a human support representative named Sarah.
Sarah asked for clarification about my specific use case, then provided a detailed, technically accurate answer about OVHcloud’s kernel support policies, including links to documentation on custom kernel compilation.
My Impression: The entire interaction felt professional, knowledgeable, and remarkably fast. Unlike DigitalOcean’s ticket-only free tier, OVHcloud gave me instant human support at no extra cost.
Documentation and Knowledge Base:
OVHcloud’s Help Centre is exceptional. I found:
- Comprehensive written guides for every product and service (similar quality to DigitalOcean)
- Video tutorials showing visual step-by-step processes
- Developer documentation with API examples and SDK references
- Status page showing real-time system status and scheduled maintenance
- Active community forums where users and staff answer questions

The search functionality worked excellently. I particularly appreciated the visual guides with screenshots, which made complex tasks easier to follow than text-only documentation.
3. Hosting Features Comparison
OVHcloud Packs More Traditional Web Hosting Features Than DigitalOcean.
DigitalOcean Features
When I tested DigitalOcean, I quickly realised it’s not designed for traditional website hosting. It’s a developer-focused cloud infrastructure platform. You won’t find a familiar control panel like cPanel here. Instead, you get their cloud control panel for managing infrastructure resources.

There’s no website builder, no included email accounts, and no automatic SSL setup (though you can manually configure free Let’s Encrypt certificates). What you do get is incredible flexibility. I could spin up Droplets (virtual machines) in seconds, attach block storage volumes on the fly, and deploy apps using their App Platform PaaS.
The platform includes free cloud firewalls, free DNS management, and a free container registry with 500 MiB storage. Backups cost an additional 20% for weekly or 30% for daily backups of your Droplet cost.
DigitalOcean gives you 500 GiB to 12 TB of included bandwidth per month, depending on your Droplet size, with overage at just $0.01/GB. You can install WordPress or other CMS platforms using one-click apps, but you’ll need to manage everything yourself via SSH or install your own control panel.

It’s powerful and scalable, but definitely requires technical knowledge.
OVHcloud Features
OVHcloud surprised me with its more traditional web hosting approach alongside its cloud infrastructure. Their shared hosting plans come with features you’d expect from a conventional web host: free SSL certificates that activate automatically, daily backups included at no extra cost, and support for popular control panels like cPanel and Plesk (though these may cost extra).
I appreciated that even their cheapest Starter plan includes 2 email accounts with 5 GB storage, while higher tiers offer up to 1,000 email addresses. Storage ranges from 1 GB on the Starter plan to 500 GB on Performance plans, and bandwidth is completely unlimited.
Their one-click CMS installer makes deploying WordPress, Joomla, Drupal, or PrestaShop simple.

The security features also impressed me. You get built-in anti-DDoS protection (Layer 7), anti-virus and anti-spam protection for email, and 99.9% observed availability. OVHcloud also offers 30-day backup retention with easy restoration.
However, like DigitalOcean, there’s no website builder included, and site migration isn’t handled for you (though they provide detailed guides). For their VPS and dedicated servers, you get NVMe storage, 99.95% SLA, automatic daily backups, and built-in anti-DDoS protection. Overall, OVHcloud bridges the gap between traditional hosting and cloud infrastructure better than DigitalOcean.
4. Website Performance Comparison
OVHcloud Delivers Blazing Fast Load Times, Beating DigitalOcean Significantly.
To get objective performance data, I ran GTmetrix tests on two live websites: one hosted on DigitalOcean and another on OVHcloud.
DigitalOcean Test Results
|
|

DigitalOcean delivered a solid performance with a 97% GTmetrix score. The TTFB of 463ms is decent but not exceptional. It indicates the server took nearly half a second to begin responding.
The Largest Contentful Paint (LCP) of 1.1s is good and meets Google’s “good” threshold (under 2.5s). However, the Fully Loaded Time of 4.1s is concerning for a modern website. Visitors had to wait over 4 seconds for everything to finish loading.
OVHcloud Test Results
|
|

OVHcloud’s performance was dramatically faster in real-world metrics. The TTFB of just 63ms is exceptional. The server responded in a fraction of the time DigitalOcean took (7.3x faster).
The Largest Contentful Paint of 377ms is outstanding. Content appeared almost instantly. Most impressively, the Fully Loaded Time of 1.1s means the entire page finished loading in barely a second, compared to DigitalOcean’s 4.1 seconds.
5. Ease of Use Comparison: Which Platform Is Easier to Use?
OVHcloud Offers a More Beginner-Friendly Experience Than DigitalOcean.
Registration and Creating a New Account
The registration process is your first interaction with a hosting provider, and it sets the tone for everything that follows. A smooth, intuitive signup tells you the company values user experience. A confusing one? That’s a red flag that things might get harder from there. I wanted to see which provider made it easier to get started without roadblocks or confusing steps.
DigitalOcean Registration
I began with DigitalOcean to see how easy it is to sign up and if the process is intuitive and straightforward. The process is primarily done through their official website at https://www.digitalocean.com/.
After clicking the prominent “Sign Up” or “Get Started” button in the top right corner, I was presented with three signup options: email, Google, or GitHub. I chose the email method to see the full process.

Step 1: I entered my email address and created a password, then confirmed it.
Step 2: DigitalOcean immediately sent a verification email. I opened my inbox, found the email, and clicked the verification link to activate my account.
After clicking the verification link, I was asked a few onboarding questions:
- What is your role?
- What do you plan to use DigitalOcean for?
- How many teammates will you collaborate with?

I filled them out just to complete the setup. They help DigitalOcean tailor recommendations, but you can skip or change them later.
Once I submitted those details, I was instantly redirected to the main dashboard. Here, I was greeted with my first default project titled “first-project.” The interface displayed a few sections like Resources, Activity, and Settings, along with a welcome message that briefly introduced DigitalOcean’s products:
“When you build on DigitalOcean, you can have full control of your infrastructure (with products like Droplets and Reserved IPs) or let us handle the infrastructure for you (with products like App Platform, Load Balancers, and Managed Databases).”
Below that, I saw the next steps to get started:
- Add a Payment Method to finish account setup
- Spin up a Droplet (a virtual machine you can create in seconds)
- Deploy a Web App using the App Platform
- Explore Cloudways & DigitalOcean, their managed hosting solution

Overall, the dashboard layout felt intuitive. Everything you need to launch your first resource is clearly visible. It’s a smooth start that makes you feel ready to build right away.
Important note: DigitalOcean often offers up to $200 in free credits to new users (valid for 60 days), which are automatically applied after you add billing information. You won’t be charged until your usage exceeds the credits or the credit period expires, whichever comes first.
The signup was fast and functional. I appreciated that there were no unnecessary steps or confusing detours. What stood out was how beginner-friendly the layout felt. The dashboard doesn’t overwhelm you with options, yet it gives you everything you need to start.
OVHcloud Registration
Next, I went to OVHcloud to see how it compares to DigitalOcean, and the experience felt significantly more refined and enterprise-grade.
I navigated to their hosting section via the “Domain Hosting Email” dropdown and selected “Web Hosting.”

Their plans were clearly presented with the “Personal” plan marked as “Bestseller” at $4.39/month.

After clicking “Order now,” I immediately encountered something unique: configuration choices during signup. OVHcloud asked me to select:
- CMS Installation: I chose WordPress (included in the price), which would eliminate manual installation later
- CDN Options: Basic, Security, or Advanced CDN. I skipped this
- SSL Certificates: Free Let’s Encrypt was included, with paid Sectigo options available

The dynamic “Your selection” summary on the right tracked my choices in real time, showing the total cost of $52.68 for the first year. This transparency was excellent. I knew exactly what I was paying before proceeding.
I then clicked “Continue Order.” This took me to the domain selection page.
Since “1 domain included” for the first year, I could either register a new domain or use an existing one. I clicked “Continue to Order” with my existing domain, keeping my price stable.

This took me to the Login/Account Creation step. Since I already had an OVHcloud account, I logged in. New users would create an account at this stage with basic information (name, email, password).
OVHcloud immediately required two-factor authentication via email code. This extra security layer felt reassuring without being burdensome.
What truly impressed me was the “Manage contacts/holders” screen, allowing granular role assignments:
- Administrator: Handles legal questions, renewals, transfers
- Technical: Manages DNS server settings
- Billing: Receives payment notifications

The final step was the payment. The order summary was crystal clear, and payment options (credit card and PayPal) were straightforward. I received immediate email confirmation upon completion.
Winner: OVHcloud’s registration process was superior. While DigitalOcean’s signup was fast, OVHcloud offered more transparency, configuration options during purchase, and better security without feeling complicated. The ability to pre-configure a WordPress installation during signup saved significant time later.
User Interface – Client Area and Dashboard
The dashboard is where you’ll spend most of your time managing your hosting, so it needs to be intuitive, well-organised, and provide quick access to the features you use most.
DigitalOcean Dashboard
After registration, I was immediately directed to the DigitalOcean Cloud Control Panel, and the first thing I noticed was how clean and minimal the interface looked.
The layout is intuitive, with a left-hand sidebar showing all the core management tools, from Droplets and Databases to App Platform, Volumes, and Monitoring. Everything is logically grouped, so it’s easy to find what you need, even if you’re completely new to cloud hosting.
At the centre of the dashboard, my default project (“first-project”) was already created. The Resources, Activity, and Settings tabs made it clear that this is where all my future deployments and actions would live.
Right below the welcome message, I found quick-start cards guiding me through the next steps:
- Add a Payment Method to complete setup
- Spin up a Droplet (their version of a virtual machine)
- Deploy your Web App with the App Platform
- Explore Cloudways & DigitalOcean, their managed hosting service
Each card comes with a short explanation, so I knew exactly what each option would do before clicking. This makes onboarding feel approachable. There’s no need to dig through documentation right away.
Scrolling further, I noticed a “Create something new” section that offers shortcuts to advanced tools like AI Inference Endpoints, GPU Droplets, and Managed Databases, as well as helpful links for things you might want to do later, like adding storage, taking snapshots, or managing DNS.

I really liked that the Learn more section on the right links directly to tutorials, documentation, and community forums. It gives you a sense that help is always one click away.
Overall, my first impression of the dashboard was positive. It’s organised, professional, and welcoming to both beginners and developers. It doesn’t feel cluttered or intimidating, yet you can tell it’s built to scale with serious workloads.
OVHcloud Control Panel
The OVHcloud Control Panel immediately felt more polished and beginner-friendly than DigitalOcean’s offering. After logging in, I was greeted with a clean, modern interface using a lighter colour scheme that’s easier on the eyes for extended use.

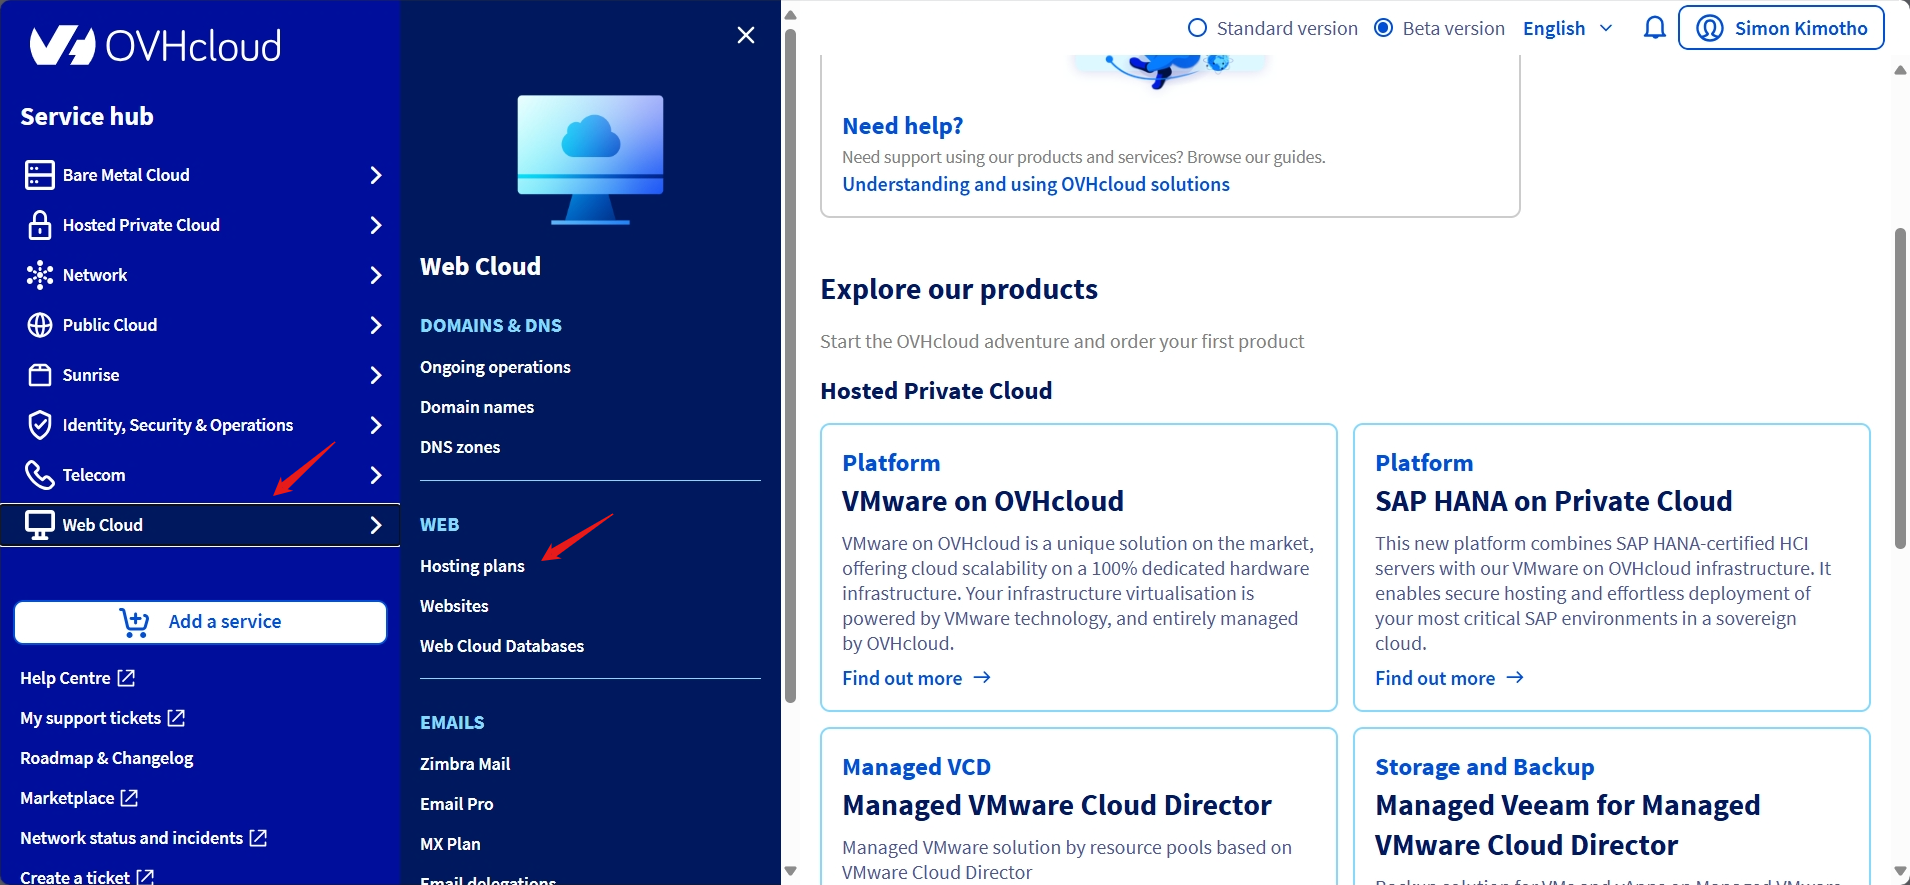
Left Sidebar Organisation:
- Web Cloud: Hosting plans, domains, emails (this is where most shared hosting users will spend their time)
- Bare Metal Cloud: Dedicated servers
- Public Cloud: Cloud instances and projects
- Sunrise: Recently accessed items (handy shortcut)
Navigating to Web Cloud > Hosting Plans: I selected my purchased plan and found a comprehensive dashboard with clearly labelled tabs:
- General Information: Plan details, status, renewal date, and quick actions
- 1-click Modules: Visual icons for WordPress, Joomla, Drupal, PrestaShop with simple “Add a module” buttons

- Databases: Create and manage MySQL databases with visual indicators
- FTP-SSH: Connection credentials clearly displayed with enable/disable toggles for SSH
- Email: Configure mailboxes with intuitive forms
- Statistics: Beautiful graphs showing traffic, bandwidth usage, and connection statistics over time
- Tasks: View recent operations and their status
Everything felt logically placed and visually cohesive. The 1-click modules tab particularly impressed me, with large, colourful icons for each CMS that made it immediately clear what was available.
Additional Features:
- Chatbot: A helpful 24/7 chatbot in the bottom-right corner for quick questions (absent in DigitalOcean)
- Server Monitoring: Detailed graphs tracking CPU, RAM, and bandwidth usage with customisable time ranges
- API Section: For automation-minded developers, programmatic control is available
- Support Ticket System: Integrated directly into the dashboard
My Assessment: OVHcloud’s Control Panel strikes an excellent balance between simplicity and power. Beginners can accomplish common tasks (installing WordPress, managing emails, viewing statistics) without technical knowledge, while advanced users have access to SSH, APIs, and detailed monitoring. The visual design is more refined than DigitalOcean’s, with better use of colour, spacing, and intuitive icons.
Winner: OVHcloud wins the dashboard comparison for general users. While DigitalOcean’s dashboard is more powerful for cloud infrastructure management, OVHcloud’s Control Panel is more accessible, visually appealing, and better suited for users who want to manage websites without deep technical expertise. The integrated chatbot, clear statistics graphs, and intuitive tab organisation make daily tasks significantly easier.
Hosting Setup: Creating a New WordPress Website
Installing WordPress is one of the most common tasks for web hosting users, so I wanted to see which provider made this process simpler.
DigitalOcean WordPress Installation
DigitalOcean was a very different experience from the normal hosting providers I was used to. Instead of a simple “Install WordPress” button, I launched a WordPress Droplet through their Marketplace, essentially deploying a pre-configured virtual server.
Step 1 – Accessing the Marketplace: From the main dashboard, I clicked “Create” → “Droplets” → “Marketplace” tab. I searched for “WordPress” and selected the WordPress on Ubuntu 22.04 image.

Step 2 – Configuring the Droplet: This is where complexity began. I had to make several technical decisions:
- Datacentre Region: Choose closest to my users (I selected NYC1)
- Plan Type: I chose the Basic plan with 1GB RAM ($6/month minimum. WordPress won’t run reliably on cheaper options)
- Authentication: SSH Key (recommended) or Password. I used SSH Key, which required generating a key pair on my computer first
- Hostname: Named it “WordPress-Droplet-1”
- Additional Options: I enabled monitoring (free) and considered backups (+20% cost)

After clicking “Create Droplet,” it took about 60 seconds for the server to deploy. I received an IP address: 159.65.229.15.
Step 3 – The Security Placeholder: When I visited the IP address in my browser, I saw a placeholder page warning me NOT to proceed until I configured WordPress via SSH. This security measure prevents attackers from hijacking the installation, but it also meant I couldn’t complete setup through a browser.
Step 4 – SSH Configuration (The Complex Part): To proceed, I had to connect via SSH from my computer’s terminal. On Mac, I opened Terminal. On Windows, users need PuTTY or similar.
I ran this command:
ssh root@159.XX.XXX.15
Once connected, a setup wizard ran in the terminal, prompting me for:
- Domain name: I entered my domain (example.com)
- Admin email: My WordPress admin email
- Admin username: My chosen username
- Admin password: My chosen password
- Blog title: My site name
- Let’s Encrypt SSL: Whether to automatically generate a free SSL certificate (I chose yes)
The terminal wizard worked well, but it required comfort with command-line interfaces. For beginners unfamiliar with SSH or Terminal, this would be an immediate roadblock.
Step 5 – Logging Into WordPress: After the configuration was completed, I navigated to https://mydomain.com/wp-admin and logged in with the credentials I created. WordPress was now ready.
Additional Technical Notes:
- MySQL database credentials were stored in /root/.digitalocean_password
- I had to manually configure DNS settings to point my domain to the Droplet’s IP
- Firewall rules (UFW) were pre-configured but could be adjusted via SSH
- The Droplet included Apache, MySQL, PHP (LAMP stack), Fail2ban, and UFW security
My Assessment: DigitalOcean’s WordPress installation is powerful but developer-focused. You get full control over server configuration, security, and customisation, but you need to be comfortable with SSH, terminal commands, and basic server administration. For experienced developers, this is fantastic. For beginners or non-technical users, it’s unnecessarily complex and intimidating.
Time Required: 20–30 minutes (including SSH configuration)
OVHcloud WordPress Installation
OVHcloud offers two WordPress installation options: automatic during signup or via a 1-click module post-purchase. I tested both to see which was easier.
Option 1: Automatic During Signup (Easiest)
During the registration process I described earlier, I simply selected “Pre-installed WordPress” in the configuration step. That’s it. No additional steps required.

When my hosting was activated (within minutes), WordPress was already installed and ready to use. I received admin credentials via email:
- WordPress admin URL: https://mydomain.com/wp-admin
- Username
- Password
- Database details (for reference)
I logged in immediately and began customising my site. Total technical effort required: zero. This is the absolute easiest WordPress installation I’ve ever experienced.
Option 2: Post-Purchase 1-Click Installation
To test the manual method for users who didn’t select WordPress during signup:
- Logged into OVHcloud Control Panel
- Navigated to Web Cloud > Hosting Plans
- Selected my hosting plan
- Clicked the “1-click modules” tab
- Clicked “Add a module”
- Selected WordPress from the visual CMS icons (WordPress, Joomla, Drupal, PrestaShop were available)
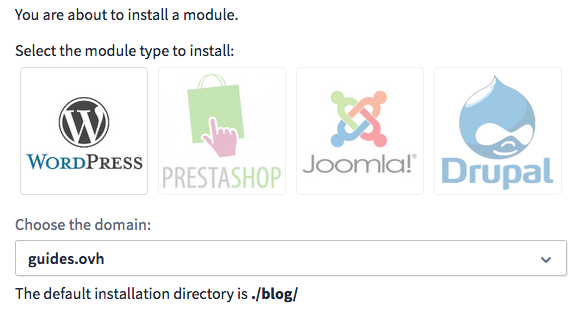
- Chose installation type:
- Quick Installation: Automatic database creation and configuration (I chose this)
- Advanced Installation: Custom database settings, admin path customisation
- Selected the domain/subdomain where I wanted WordPress installed
- Clicked “Confirm”


The installation process began immediately. A progress indicator showed the status. Within 15 minutes, I received an email containing:
- WordPress admin URL
- Username
- Password
- Database name, username, and password
I logged into https://yourdomain.com/wp-admin with the provided credentials and immediately began customising my site.
No SSH required. No command-line. No server configuration. No manual DNS setup.
The entire process required zero technical knowledge. Even users who have never used hosting before could complete this successfully.
My Assessment: OVHcloud’s WordPress installation is dramatically simpler than DigitalOcean’s. The automatic option during signup is the gold standard for ease of use. WordPress is ready before you even log into the control panel. The post-purchase 1-click installation is also excellent, requiring only a few clicks and no technical skills.
The only minor drawback: OVHcloud provides limited post-installation support for WordPress itself. You’ll rely on WordPress documentation and community forums for CMS-specific help, but the installation itself is foolproof.
Time Required: 1 minute (automatic during signup) or 15 minutes (post-purchase 1-click)
Winner: OVHcloud absolutely dominates this category. While DigitalOcean offers more control and customisation, OVHcloud’s approach is vastly more accessible for the majority of users who simply want to get WordPress running quickly without learning server administration.
Server and Hosting Management
Server management is where the rubber meets the road. This is how you monitor performance, adjust resources, configure security, and keep your site running smoothly.
I wanted to see which provider offered better tools for both beginners and experienced users.
DigitalOcean Server Management
With DigitalOcean, server management means working with your Droplet dashboard. From the main dashboard, I clicked on my active Droplet, which opened the detailed management panel.

Overview Tab: The first thing I saw was real-time monitoring graphs showing:
- CPU usage: Percentage utilised over time
- Disk I/O: Read/write activity
- Bandwidth: Inbound and outbound network traffic
- Memory: RAM usage (though this requires installing the DO agent)

I appreciated seeing both historical trends and live performance. It made spotting traffic spikes or resource bottlenecks easy. For production workloads, this visibility is invaluable.
Power Controls: Right below the graphs were power management options:
- Reboot: Restart the Droplet
- Power Cycle: Force hard reset
- Power Off/On: Shut down or start the Droplet
- Console Access: Browser-based terminal for emergencies
Resize Feature: The “Resize” button lets you upgrade or downgrade resources instantly:
- Increase CPU/RAM with minimal downtime
- Add more disk space (permanent. It cannot be reduced later)
- Scale to match traffic demands
I tested resizing from the 1GB plan to 2GB. The process took about 2 minutes of downtime, then my Droplet restarted with double the RAM. Impressive.
Networking Features: From the same panel, I could:
- Assign Floating IPs: Static IPs that can be reassigned between Droplets (useful for zero-downtime deployments)
- Configure Firewalls: Block unwanted traffic by port/protocol
- Set Up VPC: Create private networks for isolating traffic between Droplets
- Enable IPv6: Add IPv6 connectivity
Backups and Snapshots:
- Enable Backups: Toggle automated backups (20% extra cost)
- Create Snapshot: Manual restore point before major changes
- Restore from Backup: Create new Droplet from previous backup
Monitoring and Alerts: The “Monitoring” tab impressed me. I could set up alerts for:
- High CPU usage (e.g., alert if >80% for 5 minutes)
- Memory exhaustion
- Disk space running low
- Bandwidth spikes
Alerts are sent via email, Slack, or PagerDuty integration.
Assessment: DigitalOcean’s server management is powerful and flexible. I could scale resources instantly, monitor performance in real time, and secure my setup with firewalls and private networks. However, this dashboard is designed for people comfortable with server administration. There’s no hand-holding. You need to understand what CPU load, disk I/O, and firewall rules mean.
For developers and system administrators, it’s excellent. For beginners, it’s overwhelming.
OVHcloud Server Management
OVHcloud’s approach varies significantly by service type, and I found their tools more comprehensive than DigitalOcean’s:
For Shared Hosting (Web Cloud): The Control Panel provides beautiful, interactive statistics dashboards showing:
- Bandwidth usage over time: Visual graphs with selectable date ranges
- Number of connections: Active HTTP/FTP connections
- HTTP requests per minute: Traffic patterns throughout the day
- Resource usage trends: CPU and memory utilisation (on Performance plans with guaranteed resources)

Boost Option: OVHcloud includes a “Boost” feature that temporarily increases resources to handle traffic spikes. I could activate it with a single click. No manual scaling was required. After the traffic surge passed, resources automatically returned to normal. This is perfect for e-commerce sites expecting sales events.
Cron Job Management: The Control Panel includes a visual interface for scheduling automated tasks (cron jobs):
- No command-line knowledge required
- Select frequency (hourly, daily, custom)
- Enter command to execute
- Enable/disable with toggle switches
PHP Version Switching: I could change PHP versions (5.6, 7.4, 8.0, 8.1, 8.2, 8.3) with a dropdown menu. No technical configuration needed. Useful for testing compatibility before upgrading.
For Dedicated Servers:
IPMI/KVM Access: OVHcloud provides hardware-level remote console access (IPMI/KVM over IP) that works even when the operating system is unresponsive:
- Access BIOS settings remotely
- Reinstall OS if system crashes
- Troubleshoot boot failures
- Mount virtual media (ISO files)
This is a massive advantage over DigitalOcean, which only offers software-based console access.
Monitoring Configuration: Set up automated alerts for:
- Server downtime (ping failures)
- High CPU usage sustained over time
- Disk space warnings (e.g., alert at 80% full)
- Network issues or packet loss
- Temperature warnings (hardware overheating)
Alerts are sent via email or SMS (SMS costs extra).
For Public Cloud Instances:
OVHcloud uses the Horizon dashboard (OpenStack-based), which provides:
- Browser-based VNC access: Console access without SSH
- API automation tools: Programmatic control of instances
- Integration with external monitoring: Prometheus, Grafana, etc.
- Volume management: Attach/detach block storage visually
- Snapshot scheduling: Automated snapshot creation
Assessment: OVHcloud wins the server management category with more comprehensive monitoring, configurable alerts, superior visualisation, and hardware-level access (IPMI/KVM). Their interface balances simplicity for beginners (visual graphs, one-click Boost, no-command-line cron jobs) with advanced features for professionals (rescue mode, IPMI, API automation).
DigitalOcean’s interface is clean and functional for infrastructure management, but OVHcloud’s integrated automation options and detailed dashboards make it more valuable for users at all skill levels.
6. Privacy and Security Comparison: Which Platform is More Secure?
Both Providers Offer Enterprise-Grade Security, but OVHcloud Has Stronger Data Privacy Protections.
DigitalOcean Privacy and Security
DigitalOcean provides comprehensive security with encryption at rest and in transit across all services. Managed Databases use LUKS encryption, while Spaces employs AES-256 full-disk encryption. All traffic to App Platform, Functions, and Managed Databases is encrypted using HTTPS and TLS/SSL by default.
For access control, I enabled Multi-Factor Authentication (MFA) on my account, which added a critical second-layer protection.

DigitalOcean strongly recommends SSH key authentication for Droplets instead of passwords, which I tested and found eliminated password-based attacks entirely. Their Role-Based Access Control (RBAC) allows granular team permissions, and Custom Scopes for API Tokens let me restrict tokens to specific resources and actions.

Network security includes free Cloud Firewalls (stateful, network-based), which I configured to block all traffic except necessary ports. Virtual Private Cloud (VPC) provides isolated private networks.
DigitalOcean is certified for SOC 2 Type II, SOC 3 Type II, and CSA STAR Level 1, and complies with GDPR, CCPA, and PIPEDA. Their privacy policy clearly outlines data collection and usage, and they follow strict guidelines for responding to legal requests.
OVHcloud Privacy and Security
OVHcloud takes a strong stance on data privacy with a commitment to European data hosting regulations and GDPR compliance. What immediately stood out was their option to host data exclusively within the European Union to comply with European regulations, critical for organisations with strict data residency requirements.
Security-wise, OVHcloud is certified for ISO 27001, PCI-DSS, SOC 1 and SOC 2 Type II, demonstrating adherence to international security standards. Their Information Security Management System (ISMS) undergoes annual external audits to attest to security controls.

Physical data centre security is rigorous, with intrusion detection systems (IDS), vulnerability management, and risk management protecting systems and hosted data.
For customer account security, I enabled Multi-Factor Authentication (MFA) on my OVHcloud account, which worked seamlessly via email verification codes. Their advanced Identity and Access Management (IAM) provides fine-grained control over who can perform which actions.
OVHcloud’s shared hosting plans include automatic daily backups (30-day retention), free SSL certificates that activate automatically, anti-DDoS protection (Layer 7), and anti-virus/anti-spam scanning for emails. These features are included by default, unlike DigitalOcean’s optional approach. Higher-tier plans include Web Application Firewall (WAF) protection.
One unique advantage: OVHcloud’s European focus means stronger privacy protections under GDPR, with data processing agreements that prioritise user rights.
7. Server Locations Comparison
OVHcloud Dominates with 43 Global Datacentres Across 4 Continents vs DigitalOcean’s 12.
When evaluating hosting providers, server locations matter more than most people realise. The closer your server is to your visitors, the faster your website loads.
I wanted to see which provider offered better global coverage to serve audiences worldwide with minimal latency.
DigitalOcean Server Locations
DigitalOcean operates 12 datacentres across 9 regions, which I found adequate but limited compared to competitors.

They also have two legacy datacentres (AMS2 and SFO1) that are restricted for new resource creation due to a lack of physical expansion space.
Existing users can still deploy there, but DigitalOcean strongly recommends using newer facilities like AMS3 or SFO3.
My Assessment: DigitalOcean’s coverage hits major markets (North America, Western Europe, and key Asia-Pacific hubs), but there are notable gaps. No presence in South America, Africa, or the Middle East means users in those regions face higher latency.
The concentration of multiple datacentres in the same cities (three in NYC, two in San Francisco, three in Amsterdam total) feels redundant rather than geographically diverse.
Important Limitation: You cannot directly change a Droplet’s datacentre region after creation. I tested this by trying to move a Droplet from NYC3 to LON1. The only option was creating a snapshot, then deploying a new Droplet in London from that snapshot. This process took about 20 minutes and required temporary downtime.
For App Platform deployments, region changes aren’t supported at all. You must completely redeploy the app.
OVHcloud Server Locations
OVHcloud absolutely crushes DigitalOcean in global coverage with 43 datacentres across 4 continents in 9 countries, with plans for 7 more facilities.

OVHcloud’s infrastructure includes multiple availability zones in major regions. For example, Paris has 3 availability zones across 9 datacentres, providing fault-tolerant, high-capacity network infrastructure. This multi-AZ approach significantly improves redundancy and disaster recovery capabilities.
Additional Global Presence: OVHcloud also has points of presence in Argentina, Bangladesh, Brazil, Cambodia, Hong Kong, Indonesia, Japan, Malaysia, New Zealand, the Philippines, South Korea, Vietnam, and Laos, expanding its reach far beyond its primary data centre locations.
OVHcloud offers 44 redundant Points of Presence (PoPs) around the world, which act as network access points to reduce latency even in regions without full datacentres.
My Assessment: OVHcloud’s European dominance gives European users incredible proximity and compliance options (especially for GDPR). Their multi-AZ architecture in Paris provides enterprise-grade fault tolerance.
While their North American presence is smaller than DigitalOcean’s, their global reach into South America (Brazil, Argentina), additional Asia-Pacific locations, and extensive PoP network make them superior for truly international projects.
Important Advantage: OVHcloud lets you select datacentre locations during service creation and provides clearer guidance about data residency, latency optimisation, and compliance requirements for each region.
DigitalOcean vs OVHcloud: The Bottom Line
I chose OVHcloud as the overall winner because it delivers a more complete, user-friendly hosting experience without sacrificing power. OVHcloud’s dramatically faster performance (1.1s vs 4.1s load times), included essentials (daily backups, email hosting, automatic SSL, live chat), superior global reach (43 datacentres), and beginner-friendly interface make it ideal for most users.
| Category | Winner | Why |
| Pricing and Plans | DigitalOcean | Simpler monthly pricing with predictable costs, lower entry point ($4/month), and transparent billing structure that’s easier to understand than OVHcloud’s complex hourly rates. |
| Support | OVHcloud | Live chat included on free tier (DigitalOcean charges $40/month), phone support available, multilingual assistance, and 24/7 chatbot for instant help without waiting for tickets. |
| Hosting Features | OVHcloud | Includes 2–1,000 email accounts, automatic SSL, daily backups, cPanel/Plesk support, unlimited bandwidth, и 30-day backup retention, all features DigitalOcean lacks or charges extra for. |
| Website Performance | OVHcloud | 1.1s page load vs DigitalOcean’s 4.1s (3.7x faster), 63ms TTFB vs 463ms (7.3x faster server response), and 377ms Largest Contentful Paint vs 1.1s. Dramatically better real-world speed. |
| Ease of Use | OVHcloud | Automatic WordPress installation during signup, visual control panel with file manager, no SSH required, integrated phpMyAdmin, one-click Boost feature, and beginner-friendly interface throughout. |
| Privacy and Security | OVHcloud | Stronger GDPR compliance, EU data hosting options, included daily backups, automatic SSL, anti-virus/anti-spam, WAF on higher plans, and superior data sovereignty protections. |
| Server Locations | OVHcloud | 43 datacentres across 4 continents vs DigitalOcean’s 12, multi-availability zone architecture, extensive PoP network, better coverage in Europe, South America, and Asia-Pacific regions. |

